Thanks for checking in today. Unfortunately I have nothing new to share. It's been a nutty week. Caro sposo has been in Austin TX, and his flight back today was cancelled. As a result, I'm still playing single mom and running around like a crazy person. My mojo's gone! I have some nearly finished scrapbook pages, but I won't get around to them until next week: I'm going camping this weekend.
Possibly in the rain. Woo.
(-:
Come back after Canada Day, I should have more for you then.
C
Thursday, June 26, 2008


Tuesday, June 24, 2008
More scrappin'
 Here's another scrapbook spread completed this past weekend: our trip to Wonderland in May. Again, the paper was picked up at the scrapbook store en route, the title is from the Cricut, the sticker is Creative memories, the brads are mostly stolen from Wendy, and the buttons are SU!
Thanks for stopping by!
Monday, June 23, 2008
Scrappin' Aspen
I'm back from a glorious scrapbooking weekend with friends. I'd have gotten more done, I think, if I hadn't slept in so late on Sunday (*bliss*). That and less agonizing; I agonize too much over pages. Look at how many pages we completed:
 Without further ado, I give you the first of my three 2-page spreads completed this weekend. (ok. the third wasn't quite done when I left. Stop quibbling!)
 Without further ado, I give you the first of my three 2-page spreads completed this weekend. (ok. the third wasn't quite done when I left. Stop quibbling!)
I am completely in love with my friend Marci's Cricut. I smell a purchase in my not-so-distant future. Either a Cricut or a Silhouette. They're both pretty slick. The title and the white snowflakers were done on the Cricut. The paper I picked up en route to the scrappy weekend at a scrapbooking store in Barrie (Nicole's inspired idea. Thanks!) The blue snowflake brads are SU! Build-A-Brads (love 'em), the flowers are Prima's from the Barrie store (flowers on a ski page?!), the white snowflakes were mooched from Marci (thanks!), the skis are a QuicKutz die I've been holding onto, and the bottom medallion is a cuttlebug embossing folder.
It's worth mentioning that I'm still pretty new to this whole scrapbooking thing, so if my pages are weak, bear with me.
Gosh, this weekend was a lot of fun. We ate until we were at risk of bursting, scrapped for hours on end, and laughed bunches. Heaven.
Please come back tomorrow for another spread.
C
Saturday, June 21, 2008
Birthday RAK
 It is so hard to do justice to a sparkly card in photos! This beauty was given to me for my birthday by a terrific friend. It's made with coloured vellum, and she has dry embossed the flowers and background. There are hints of glitter on the flowers, and the rhinestone brads add more twinkle. So pretty! For more of her creations, visit Wendy's Little Inklings (link is on the right).
I'm off now to try to pack for the scrapping weekend (which I'll be on by the time this posts).
Thanks for stopping by,
C
Friday, June 20, 2008
This isn't packing... (BIC18)
 Last night, when I was supposed to be packing for a girly scrappy weekend (One bin? I can't fit it all in one bin!), I decided to try a challenge for the first time. I really liked the cake Beate posted as the inspiration for the "be inspired challenge" (aka: BIC18). Since my dear daughter is graduating today from Kindergarten, I thought I'd kill two birds with one stone and make this her graduation card.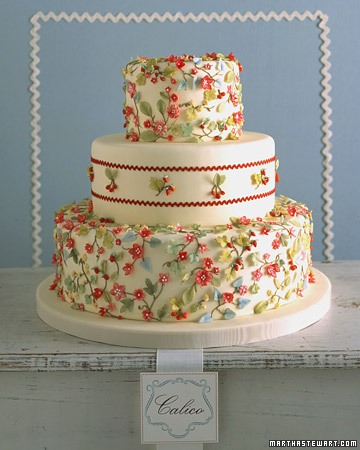
I used the following paper colours:
- Ruby Red
- Cameo Coral
- Bashful Blue
- Certainly Celery
- Very Vanilla
I punched bunches of little flowers out with a small EK Success flower punch (not SU!), and a bunch more smaller punches with a Michael's $1-bin punch. All of the flowers had Ruby Red ink added to their centres, with a few white dots.
The green leaves and blue buds were also punched using the EK Success flower punch, I just trimmed off each petal to make the leaves/buds. Did I mention there was a lot of cutting involved? A lot of cutting.
To map out where I was going to place my flowers, etc. I first stamped the very vanilla cardstock with one of the flower stems from Garden Silhouettes in Blush Blossom ink, just so I had something to follow. I traced over the stems with my Old Olive marker.
Then, with a lot of 2-way glue, I stuck everything down.
For the rick-rack across the middle, I had to wing it because I didn't have any ribbon. So, I grabbed a pair of my fancy scissors (which, I might add, I haven't used since I bought the darned things) and cut my own rick-rack out of Ruby Red paper. I'm pleased with how it turned out.
I stamped some cherries from Tart and Tangy and punched them out with a 1-3/8" punch before layering them onto a bit of Ruby Red that I had punched with my scallop punch. For touch of shine, I filled the cherries in with crystal effects.
It all got layered onto a few layers of bashful blue and vanilla to frame it all in.
Thanks for looking!
Thursday, June 19, 2008
Woo! 1000 visitors
How exciting!
My wee little Blob has had 1000 visits. Thanks everyone for your interest! If I hit 10,000 I'll give away some SWAG.
Keep reading,
C
My wee little Blob has had 1000 visits. Thanks everyone for your interest! If I hit 10,000 I'll give away some SWAG.
Keep reading,
C
Wednesday, June 18, 2008
Stamped Tile class - the results
 These are some of the tile coasters I made at the stamped tile class this weekend. The stamp is a background stamp I had from Michael's - the music was necessary; the coasters are teacher gifts for a very musical teacher and Stampin' Up! doesn't have a big music background. What I love about tile coasters as gifts is that they're easy, they're fast (I made four tiles and the box in under an hour), and they're extremely affordable; the whole shebang costs less than $5.00.
The tile is stamped with Black StazOn ink and I made a co-ordinating box to give the gift in.
If you want to make some yourself, we can do a mini class. Contact me to set up a date.
-Corrie.
Tuesday, June 17, 2008
New product line announced
 Stampin' Up! has just announced their new product line:
click to open PDF brochure
What are Decor Elements? They're vinyl wall transfers - similar in principle to the rub-ons in our current catalog, but much larger (meant for walls), made of vinyl, and removable. Neat!
They'll come in over 100 designs (alphabets, images, phrases) and in chocolate or white. You can begin ordering them on July 1.
C
Father's Day card
 I made these paper wallets for my dad and my husband for Father's Day. What's great about this card is that you can use the credit card slits to hold a $gift card$ and write your sentiment on "money" in the money pocket, or you can make some fake credit cards, tuck in some photos of your kids, and punch out some pretend coins to add to the coin purse.
It's made out of chocolate chip and close to cocoa paper. The cocoa paper was dry embossed with a cuttlebug folder which was first inked with chocolate chip ink. Other than that, it's just a question of figuring out the dimensions and cutting and gluing your paper. Oh, and I used a brad from dollarama for the coin-purse snap.
My husband opened his and said, "You made this out of paper!?"
Ah, another job well done. I can't take credit for the idea, but some of the design elements I cooked up myself.
Thanks for reading,
C
Monday, June 16, 2008
Fresh Cuts
 I finally received my new Fresh Cuts stamp set with the co-ordinating Fresh Cuts Notes (4"x4"). The die-cut cards are cute (though I seem to have issues extricating the cut pieces), and the quality of the envelopes is excellent. The stamp set is a sneak preview from the new catalog that will be released on August 11th. It's so cute, I'm sure it'll be one of my favourites. What has me excited is that the stamp set was die-cut when it arrived! I'm hoping that means all of the sets in the catalog will be die cut. This will make mounting new stamp sets so much easier. I'll cross my fingers if you cross yours.
 I whipped up this quick card for my Mom's birthday. I used a square of mellow moss on the inside, which I had stamped in mellow moss using the background stamp from the set. Diagonally across the card face I stamped the sprig first in blush blossom, then again in mellow moss. I also stamped a sprig in the bottom right corner, and stamped over it with the sentiment stamp in mellow moss. I punched a flower out of blush blossom cardstock (punch by Marvy) and stuck it to the centre of the flower. Next I added a mellow moss button with linen thread which is adhered with a glue dot.
Thanks for looking!
(check back soon - there's a big SU! product announcement tomorrow)
Sunday, June 15, 2008
Retiring Stamp Sets
 It's that time of year again: the list of stamp sets that are retiring has been released. When the new catalog comes out on August 11, you won't be able to get these sets any longer. Peruse the lists to be sure you're not going to miss out on a set you had your eye on. You have two options:
View the list in alphabetical order.
View the list in numerical order by catalog page number.
I'll be placing an order on or before June 29 (no workshop attendance necessary). Let me know if you want to place an order; we can save on the shipping if we pool the orders together.
A new catalog is always bittersweet. I'm sad to lose some great stamp sets, but it's also exciting to see the new products that are being introduced.
Thanks for reading. I have a few new projects to post in the coming days.
C
Wednesday, June 11, 2008
Stamped Tiles

Wow, time really flies when you're non-productive. The only thing I have to show for the last 5 days is a pair of scrapbooking pages that I'm less-than-enamoured with. So I'll spare you the visual torment and let you know what I'm dabbling with now.
 #1 -StazOn only.
 #2 - StazOn, baked.
 #3 - StazOn, sealed.
 #4 - StazOn, baked, sealed (I was a bit heavy-handed with the first coat of sealant, and the baked StazOn bled a bit)
 #5 - Stazon, Classic ink, sealed.
In anticipation of a tile stamping class I'm doing on Saturday, I've been playing! There are a lot of conflicting instructions on the web about the exact process for creating stamped tiles: Do you use StazOn ink? Do you heat-set the ink? Do you seal the tile, etc., etc.
After some experimentation using StazOn I can affirm that: StazOn works great. Because it's a solvent-based ink, you don't need to bake it or seal it. As long as you let it sit a few hours to dry (perhaps overkill), you can get the tiles wet and the ink won't bleed. Nice! And very, very fast. Now, if you want to colour your tiles with classic ink, chalk, etc., you'll need to seal them. And if you want to use pigment ink instead of StazOn, you'll need to bake them (and possibly seal them).
There's still room in my class if you want to join us Saturday at 4. Sign up now.
Here are some 4"x4" tumbled marble tile samples, all of which have been subjected to water to see if they'll bleed:
 #1 -StazOn only.
 #2 - StazOn, baked.
 #3 - StazOn, sealed.
  #4 - StazOn, baked, sealed (I was a bit heavy-handed with the first coat of sealant, and the baked StazOn bled a bit)
 #5 - Stazon, Classic ink, sealed.
Thanks for looking!
Friday, June 6, 2008
Kooky birthday
 It's the kooky birthday card!
This card was partially swiped from SCS, then it took an abrupt right turn and stopped making any sense at all. What's with all the critters? I dunno. They're fun! And they're the right size. I wanted to make a card with inchies. These little guys are each 1" square. I used Pink Passion, Pumpkin Pie, Certainly celery and a little hit of Tempting Turquoise here and there. The texture on the celery cardstock is from a cuttlebug embossing folder. Stamps sets are all retired (sorry!): Very Punny and Riveting.
What is WITH this card? I was hopped up on birthday cake when I made it. Blame the cake!
Thursday, June 5, 2008
It's the thought that counts
 My dear aunt, an avid cardmaker herself, got caught unawares on my husband's birthday.
While breaking her fast with my mum at a local diner, she realized she forgot it was his birthday and she had no card prepared to give to him. Did she let that stop her? Heck no! She just grabbed a table napkin and jotted down her heartfelt wishes.
Because it's the thought that counts - not the hours of toil, fancy cardstock and embellishments. Sure, they all combine into a labour of love that shows someone how much you care, but it's the thought behind the making of a card that really makes it special. No matter how simple the card.
I love this card.
Wednesday, June 4, 2008
June Newsletter
The June Newsletter is now available online.
If you'd like to have the monthly newsletter delivered to your inbox, sign up for my mailing list:
Sign Up Now.
If you'd like to have the monthly newsletter delivered to your inbox, sign up for my mailing list:
Sign Up Now.
Tuesday, June 3, 2008
Summer Picnic
 Here's a scrapbooking page I recently demonstrated at a workshop. I started with the Summer Picnic Designer series paper from the Occasions mini and drew the colour scheme from the paper (it's so easy this way!)
The photo block is a 6x6 piece of DS paper. The Old Olive block is a full 8.5 x 11 sheet of cardstock that I wheeled on the left side with the Basics Outline wheel in Old Olive ink. The strip down the left side is 1.5" wide, and is matted with a 2"-wide strip. The stamp sets useds are Happy Everything, Holiday Blitz (flip flops) and Bud Basics (flower).
I love using the crop-o-dile to set eyelets: it's so easy and quiet!
Monday, June 2, 2008
June Stamp Class
 Join me at my place on June 14th when we’ll make some gorgeous stamped tile coasters together. Since summer afternoons are too good to pass up, I’m going to run the class from 7-9 p.m. this time.
The tile coasters are perfect as teacher gifts, last minute hostess presents, or to add some pizzazz around the house. To participate in the class you have some options:
1) Order and use the new Fresh Cut Stamp set ($30.00 total) – no class fee.
2) Order and use a background stamp (pg 134-136, $26.53 total) – no class fee.
3) Bring your own background stamp and pay a $10 class fee.
Contact me by the end of the day on June 5th if you’re choosing option 1 or 2, as I’ll need to get the supply order submitted so that it’s delivered in time. That’s soon. If you’re choosing option 3, please let me know before June 11th.
Each participant will take home 4 coasters. Space is limited.
Sign Up Now.
Sorry about the last post. I never got the layout issues sorted out.
Subscribe to:
Posts (Atom)